1.31.2013

January's Foodie Pen Pals

The Lean Green Bean


Here we are - the first month of the year already gone. Poof! And since it's the last day of said month, it's time for Foodie Pen Pals. Foodie Pen Pals is the brainchild of Lindsay at The Lean Green Bean, and if you go here, you can read all about it. The basics are that each participant is assigned a pen pal to send a fun foodie box to, and then receives a fun foodie box from a different participant in return.


This month, we received a fabulously fun foodie box from Erica of Abbie and Erica's Coast to Coast Adventures (great name, btw!) that included, in her words, "a little bit of everything." Indeed! We have: vegetable pasta - a healthy pasta for the new year; chocolate cherry granola - a sweet and healthy snack; almond butter - an even yummier snack; habanero-lime salsa - a spicy, tangy salsa we will be buying from here on out; some perfectly roasted walnuts that Amy scarfed down shortly after taking that picture; a few Ghirardelli chocolate bites that Chris scarfed down shortly after taking that picture; a package of Starbucks Via packets - perfect for when we're running late for school; and our almost favorite thing - dukkah, an Egyptian spice blend of nuts and herbs that we plan to dust on chicken, fish, or just mix in with some olive oil for a nice bread dip. 


Our most favorite thing unfortunately didn't even make it into the pic - an amazingly smooth homemade peach butter that Chris started putting on everything right away and which is, we're ashamed to admit, already gone. It was way good. From a morning coffee to a quick snack to ingredients for dinner, we are all set up thanks to Erica! Thank you, and kudos your first Foodie Pen Pal experience!

We sent some olive oils from our new favorite food shop O'live A Little, to our recipient, Leah of Mackenzie Memories. You can go to her website to see what she thought about them!

If you are interested in joining Foodie Pen Pals, go here. You don't have to have a blog to join! And you'll be glad you did!

1.25.2013

Shrimp with Cellophane Noodles (French Fridays with Dorie)

We somehow don't have the time to participate in French Fridays with Dorie as often as we would like. But this week's recipe, Shrimp with Cellophane Noodles (page 322), seemed pretty easy, and so we made it last night. Basically, it involved preparing Asian noodles (we used rice vermicelli), then cooking shrimp with onions and garlic and spices (cayenne, five spice, white pepper) in a wok, then adding tomato puree (which we couldn't find so we used an immersion blender on some crushed tomatoes and added that). For a little fun, we even made garlic chips (thin slices of garlic "fried" in a little olive oil), as suggested, for a garnish.


Now, we love Dorie Greenspan, love her recipes, love her book Around My French Table (from which this recipe comes, and around which French Fridays revolve). But as for this recipe, it was just sort of weird. It tasted like an oddly sweet shrimp spaghetti that seemed neither Italian, Asian or French. After we ate it, we actually felt bad that we had treated those beautiful shrimp in such a way. We won't be making that mistake again.


1.24.2013

Chicken with Chicory


Gordon Ramsay. Some people love him. Some people hate him. Some people love to hate him. However you feel about him, you have to respect the guy. He's a successful celebrity chef and restauranteur with several Michelin stars. He's always on American television, but recently, we've been recording (from BBC) our favorite Gordon Ramsay project yet - Gordon Ramsay's Ultimate Cookery Course. This is a nice Gordon Ramsay. A gentle, helpful, teacher-esque Gordon Ramsay. Not at all shouty and mean like the Gordon Ramsay of certain other shows (it's called Hell's Kitchen for a reason, people!). And come on, the accent is pretty attractive. Amy loves how he says "basil." But we digress.


Suffice it to say, this recipe is pretty much his, from the first episode of Gordon Ramsay's Ultimate Cookery Course, which focuses on making things in a pan. There seems to be a cookbook attached to the show, but we're just enjoying figuring the recipes out ourselves by watching, as if we're having a private cooking class. Gordon doesn't always give exact measurements, and this recipe makes up only about 2 minutes in the half-hour long show, but we did our best. Whatever it was, it was yummy. And we'll be making it again. That much we know.


And by the way, chicory is endive. You donkey!

Chicken with Chicory
inspired by Gordon Ramsay's Ultimate Cookery Course, episode one

Ingredients:

2 tablespoons olive oil
2 split chicken breasts
kosher salt and black pepper to taste
2 heads chicory/endive
2 garlic cloves, crushed
handful of sprigs of thyme
1/4 cup marsala wine
1/4 cup chicken stock
2-3 tablespoons unsalted butter


Heat oil in a large skillet or cast iron pan over high heat. Season the chicken with salt and pepper and lay, skin side down, in the hot oil. Cook until skin turns golden brown. Flip the chicken to cook the other side. Cut the chicory heads in half and lay in the pan with the chicken. Add crushed garlic and sprigs of thyme and cook until chicory starts to caramelize, then flip the chicory. Add marsala and stock and continue to cook until chicken is cooked through and liquid reduces. Swirl in the butter to baste the chicken and make a pan sauce. (Our chicken breasts were pretty big, so we needed to put them in a 425-degree oven for about 20 minutes to finish cooking, during which time we left the endive and pan sauce on very low heat). 

1.23.2013

Amy Tries Lean Cuisine


Amy writes:

If you read our blog regularly, you know we are not much for low-fat, low-sugar, low-cal stuff. We use real butter and cream and all that yummy goodness, yes in moderation, but probably more than most people. But now we're in our 40s and the middle-aged metabolism just isn't what it used to be. While we probably won't change the way we cook at home, we can make one good-sized difference in how we eat one meal in particular - lunch.

This is going to be pretty difficult for Chris, because his school has the most amazing culinary program, so he is spoiled at lunch pretty much daily. However, at my school, lunch is your typical school-cafeteria fare and I mostly try to avoid it. It should also be noted that I'm quite picky about lunch. I like hot lunch and am not a big sandwich eater. The time I get for lunch depends on the day, and without going into the complexities of my high school's crazy schedule, I'll summarize by saying that it ranges from 20 to 25 minutes, with 24 minutes being the most common length. In other words, there is not a lot of time to fuss. Leftovers, if we have any, reheated in the microwave, is what I have on a typical day. But when I was offered the chance to try one of Lean Cuisine's "Chef's Picks" through the DailyBuzz Food Tastemaker program, I though, "Why not?" They certainly meet all the requirements I need for lunch these days - quick, easy, and (it goes without saying, right?) lean.


I chose "Glazed Chicken," one of the Chef's Picks from the Culinary Collection. The box describes it very well: roasted white meat chicken in a savory lemon tarragon sauce with rice, green beans and cashews - all things I enjoy. The price at my grocery was $3.50, exactly what a hot lunch at school would cost me. It took 5 1/2 minutes in the microwave, and after carefully peeling off the plastic cover, I dug in.

There were four decent-sized boneless, skinless, white meat chicken pieces (large nugget-sized) in an orange-colored sauce that, for me, seemed to need a flavor boost. I liked the consistency of the sauce and got some hints of tarragon, but the expected zestiness of lemon was lacking. The chicken was tender, easy to cut using only a fork, and not at all rubbery. So far so good. I liked the rice very much: it consisted of fluffy white rice with julienned green beans, and the toasted cashew halves and wheat berries tossed in it gave it a really nice nutty flavor. I ate the whole portion, was satisfied afterwards, and didn't even experience my usual chocolate craving a couple hours later. Quite unusual. 


And now, the best part. This lunch was 240 calories. That's it. Other nutritional facts: 5 grams of fat, 45 mg of cholesterol, a little high on the sodium (450 mg - about the same as a bagel or a serving of canned soup, and it didn't taste salty) and plenty of protein from the chicken and nuts (22 grams). Added bonus? They have a "Delicious Rewards" program for frequent buyers. All good things. And, oh yeah...no clean up. Not even a dirty dish!

I'm probably not going to be eating these every single day. However, I was so pleasantly surprised at the taste and quality of my Lean Cuisine meal that I will definitely be including them in my workaday lunch options from now on. 

Disclaimer: As part of the DailyBuzz Food Tastemaker program, I received a free sample and stipend from Lean Cuisine. Nevertheless, all thoughts and opinions stated here are my own.


I have partnered with Lean Cuisine through DailyBuzz Food to help promote their new line of Chef's Pick products. I have been compensated for my time commitment to work with this product. However, my opinions are entirely my own and I have not been paid to publish positive comments. Thank you Lean Cuisine!

1.21.2013

Creamy Crab Pasta (Secret Recipe Club)


It's time for January's Secret Recipe Club! In the SRC as we all call it, we are assigned a blog from which we make a recipe and blog about it, while someone makes one of ours in turn. It's a secret until our assigned Reveal Day, which is today. This month, we were assigned the blog Mele Cotte, which is written by Chris, and which happens to already be on our blog roll. We have a lot in common with Chris (besides the name, that is). Chris is a middle school administrator who uses her blog as a personal diary of recipes, but also as a (very cheap) form of after-school therapy. Sound familiar?


Mele Cotte has so many recipes and beautiful photographs that accompany them, making it very difficult to choose what to make. But as often happens, the contents of our refrigerator made the decision for us. A couple of weeks back, our grocery had a sale on jumbo lump crab meat, and that can has been taunting us from the shelf since then. Chris's recipe for Creamy Crab Pasta sounded like the perfect vehicle, plus it had "comfort food" written all over it!


We made a few changes, not because we doubted Chris or her recipe, but again, based on the contents of our refrigerator. It's been a lazy couple of weeks. Regardless, the dish was everything we hoped it would be - a deliciously creamy pasta with chunks of sweet crab thank clung to the pasta in a dreamy way. Luscious!

Creamy Crab Pasta
minimally adapted from this recipe on Mele Cotte

Ingredients:

¼ cup unsalted butter
¼ cup all purpose flour
2 cups half and half
½ cup grated Pecorino Romano cheese, plus more for garnish
¼ teaspoon. ground nutmeg
kosher salt, white pepper, and black pepper to taste
1 lb. cooked lump crab meat
1 lb. cooked rigatoni pasta

In a large saucepan or deep skillet, melt the butter over medium heat. Whisk in the flour and cook about 1 minute, until thick and combined, but not discolored. Whisk in cream, and stir until the sauce begins to thicken. Stir in the cheese and seasons to taste. Simmer for a few minutes to blend the flavors, and stir in the crab meat. Cook just until the crab is heated through. 
Serve over cooked pasta of choice. Top with additional cheese and pepper, if preferred.


1.16.2013

Bacon, Egg and Cheese Bread Pudding


We created this amazing brunch concoction over Christmas break, when we had lots of time to rest, relax and enjoy time in the kitchen. Its inspiration, in fact, was a Christmas gift from Amy's bestie Karen - a piece of  "Temp-tations" cookware. Isn't it gorgeous? Not only is it non-stick, but it can go straight from the  fridge to the oven to the table. We especially love the pretty glass trivet (also serves as a lid!) and the iron rack that come with it, making it so very table-ready. 


Since Karen is in New Orleans, we wanted to make something inspired by the Big Easy. After plenty of consideration and exchanging various ideas, the two of us finally came up with this: Bacon, Egg and Cheese Bread Pudding, a play on the ubiquitous sandwich. This savory bread pudding is fluffy and custardy, with salty and smoky bites of bacon and tangy cheese. Loved it, and it was perfect for our new cookware! Perhaps we'll make it again today, since we have a SNOW DAY! 


Bacon, Egg and Cheese Bread Pudding

Ingredients:

1 cup milk
1/2 cup heavy cream
3 large eggs
4 slices bacon
1 shallot, minced
5 cups cubed day-old French bread
4 ounces Gruyere cheese, grated
1 1/2 tablespoons dried parsley
kosher salt and ground white pepper to taste


Preheat oven to 375 and spray the baking dish with cooking spray. Whisk together milk, cream, eggs, salt and white pepper in a large bowl; set aside. Cook bacon until crisp, remove from pan and drain on paper towels, then chop into bite-sized pieces. Cook shallot in bacon fat over medium heat until golden, only about one minute. Add bacon, bread, cheese, cooked shallots and dried parsley into custard mixture so that all bread is covered; allow to soak for about 1/2 hour. Transfer mixture into baking dish and cover with foil. Bake for 30 minutes, then remove foil and bake for additional 10 minutes or until golden brown.


1.14.2013

Meatless Monday: White Pizza with Arugula


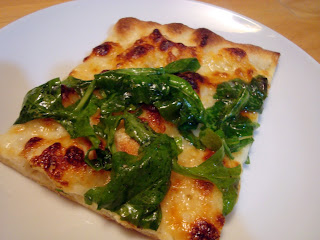
Tonight we used the last of the dough we made (we had frozen it) in a recent cooking class we took to make a pizza for Meatless Monday. We infused garlic and red pepper flakes into olive oil and brushed the dough with that, topped the pizza with a blend of mozzarella and parmesan cheeses, and baked it in a super-hot oven. While it was cooking, we tossed arugula (we got a bagful at a local farmers' market for $1!) with lemon juice and more olive oil, and when we took the pizza out, we placed the arugula right on top. Delightful!!!


White Pizza with Arugula

Ingredients:

1 premade pizza dough
4 tablespoons olive oil, divided
2 cloves garlic, sliced
pinch red pepper flakes
1/2 cup shredded mozzarella cheese
1/4 cup shredded parmesan cheese
1 cup fresh arugula
2 tablespoons lemon juice
kosher salt and freshly ground black pepper to taste


Heat pizza stone in 500-degree oven for at least 45 minutes. In a small sauce pan, heat 2 tablespoons of olive oil, garlic and red pepper flakes for 5-7 minutes over low heat, taking care not to burn the garlic. Stretch the dough and place it on a brown rice flour-dusted pizza peel. Brush the infused oil onto the dough. Top the dough with the cheese mixture and bake until crust is done to your liking and cheese is melted. In the meantime, whisk together the remaining olive oil with the lemon juice, salt and pepper, and toss the arugula in the mixture. Lay the arugula over the cheese when pizza comes out of the oven. 


1.13.2013

Cooking Class: Pizza and Focaccia (with recipes for pizza dough and sauce)

Mid-December, the two of us took a one-day cooking class at our local community college. The class was titled "Pizza and Focaccia" and it was taught by the adjunct instructor of baking and pasty at the college, Chris French. Of course, the two of us have made pizza before, but we are ashamed to say that we usually buy the dough from our grocery store or local market and then simply grill or bake it with our toppings. No more! In this class, we learned the ins and outs of making deliciously fresh pizza dough and focaccia, and enjoyed it so much Chris bought Amy a pizza peel for Christmas! So of course, we are excited to share what we've learned, with permission from the instructor.


Speaking of instructors, Chef Chris was an amazing one in that he was well-prepared with a packet that included all the information we would need, including several recipes and resources for ingredients. He walked us through each and every step of pizza and focaccia making, including the dough, the sauce, the cheese, the toppings and the various ways to cook it all. He explained the "what are the different kinds" and "why you'd use one or the other" of each ingredient, demonstrated to us exactly how to make and shape the dough and then paired us up and allowed us to make it ourselves under his guidance. Amy made a plain cheese pizza and Chris made pizza margherita. Best of all, we went home with enough dough for 4-6 pizzas (depending on the size of the pizza) as well as more focaccia than we knew what to do with!


Here's what we learned about pizza making: First of all, the type of flour does matter. Chef Chris suggested using either King Arthur Bread Flour, or Caputo "00" flour, and had us make a batch of dough with each. We found both resulted in a flavorful dough that was crisp and blistery on the outside, and perfectly chewy on the inside. Since we can readily find King Arthur at the grocery store, that has become our go-to flour. Secondly, San Marzano tomatoes, even in a can, make a fantastic no-cook pizza sauce. Just a few additional ingredients from the spice rack is all you need to transform a can of tomatoes into an easy, zesty sauce. Thirdly, brown rice flour is an excellent choice for dusting your surface/pizza peel as it doesn't burn. And finally, a really hot pizza stone inside a really hot oven will give you the best results. Heat the stone at 500 degrees for about 45 minutes before putting your pizza on it, then bake your pizza on it, also at 500 degrees.


Something we already knew, but it was nice to be reminded about: Creativity is key to pizza topping. Savory? Sure - cheese, meats, spices, vegetables, herbs - anything can top a pizza! A touch of fennel powder recreated the flavor of sausage without the meat. We even made a peach pizza with a marscapone cheese that would make for a crowd-pleasing dessert.

Admittedly, the pizza making took up most of the time allotted to the course, but Chris had made the focaccia dough ahead of time (giving us the recipe in our packets) and we simply spread the dough on large baking sheets and allowed it to rise before we topped it with truffle oil, chopped rosemary, caramelized onions, grated parmesan cheese, and a little salt and pepper. Watching sheet upon sheet of golden brown tastiness cook in the industrial oven was almost as fun as using the pizza peel!


Chris French's Pizza Dough
(cold fermented means it must be made at least one day ahead; makes 3 pizzas)

Ingredients:

3 1/2 cups (462 grams) King Arthur Bread Flour or Caputo "00"
1 1/4 cups (296 grams) water at room temp
1 teaspoon (3 grams) instant or active yeast
1 1/4 teaspoon (10 grams) salt
olive oil

Place the following ingredients in the order listed to the bowl of a Kitchenaid-type mixer: water, yeast, flour and salt. Install the bowl into the machine and mix using a dough hook (the spiral hook works better than the "C"-type hook) on speed 1 or 2. Mix until all ingredients are "picked up" and the bowl is nearly clean. Shut off and unplug the machine; scrape down the bowl if necessary. Plug the machine back in and resume mixing for another 2-3 minutes. Stop the machine and rest the dough for 10-20 minutes. Mix the dough again on speed 2 for another minute. Remove the dough from the bowl and round into a ball. Place the dough ball into a lightly oiled bowl large enough to hold 3 times its size. Roll the dough ball so it's coated with a light film of oil. cover the bowl tightly with clear wrap and place on counter for 1 hour. After the dough has rested on the counter for 1 hour, remove from bowl and divide into 3 equal sized pieces. Roll the individual small dough pieces into rounds. Place the rounds in a shallow, lightly oiled tray and cover tightly with clear wrap or a lid. Place the tray immediately in the refrigerator for 24-96 hours until ready to use. Remove the tray from the refrigerator 1-2 hours before baking pizza (it's recommended to preheat pizza stone/oven around the same time).


Chris French's Pizza Sauce
(using dry herbs avoids the extra water in fresh herbs which may make the sauce watery)

Ingredients:

1 28-ounce can San Marzano tomatoes (Chef prefers Cento brand)
2 tablespoons garlic powder
1 tablespoon parsley flakes
2 teaspoons dried basil
1 teaspoon dried oregano
1/2 teaspoon thyme
1/2 teaspoon marjoram
1/4 teaspoon black pepper
3 tablespoons olive oil
3 tablespoons either red wine vinegar or lemon juice
1/2 - 1 teaspoon salt (to taste)

Lightly blend or process the tomatoes into a coarse texture. Remove the tomatoes from the blender and combine with all of the remaining ingredients, adjusting the salt to taste. Allow the sauce to stand overnight in the refrigerator so that it can tighten up slightly. If sauce is too watery it can be strained and dried out by using a doubled cheese cloth and colander. 


Special thanks to Chef Chris French for the amazing class and permission to use his recipes here.