9.22.2011

Beef and Stout Pot Pie

Ah, fall. The kaleidoscope of colors on the sugar maples. The sound of fallen leaves crunching as you walk on the sidewalk. The faint smell of firewood coming from your neighbor's chimney. The crisp feel of the air outside. The fuzziness of the sweater you're wearing for the first time. And, oh, the food! Hearty, comforting food that needs to cook for hours and makes your house smell so delicious. Yes, we love fall. And our first great fall dish this year was Beef and Stout Pot Pie.

In this dish, a basic beef stew meets Harpoon's smooth, rich, small-batch Island Creek Oyster Stout for a flavorful and satisfying meal. Island Creek is an oyster farming and distribution company out of Massachusetts. Typically, stouts make a great pairing when eating oysters. In this case, Harpoon's brewers put the oysters right into the beer during the brewing process, although the impact to the taste of the beer is minimal. The stout has hints of roasted barley along with a slight mineral brininess from the oysters, both of which add great flavor to the chuck steak we braised in it.

We reserved the water in which we had boiled the carrots and potatoes to enhance the vegetable flavor in the pot pie. And, instead of regular old onion and garlic, we used fresh cippolini onions and hard-neck garlic from the farmers' market. Refrigerated puff pastry dough topped the deliciousness inside the bowl, offering contrasting texture with its flaky crunch as well as a hint of surprise when you break through to the chunky, meaty stew.


Beef and Stout Pot Pie

Ingredients (for 4 individual pot pies):
2 potatoes, peeled and diced
4 carrots, peeled and diced
2 lbs. boneless beef chuck steaks, cut into 1-inch pieces
2 tablespoons flour
1 teaspoon kosher salt
1 teaspoon black pepper
2 tablespoons vegetable oil
6 yellow cippolini onions, roughly chopped
2 hard-neck garlic cloves, chopped
1/4 cup water, reserved from boiling carrots and potatoes
1 1/2 tablespoons tomato paste
1 cup beef broth
1 cup Harpoon Island Creek Oyster Stout
1 tablespoon Worcestershire sauce
3 sprigs of fresh thyme
2 sheets frozen puff pastry dough
1 egg, beaten
1 tablespoon water

Boil potatoes and carrots together until tender. Drain, reserving 1/4 cup of the water, and place in refrigerator to cool. Preheat oven to 350. Place chunks of beef along with flour, salt and pepper in a large zip-type bag; toss to coat. Heat oil in a large ovenproof pot over high heat, then working in batches, brown meat on all sides, about 4 minutes per batch; set aside. Add onion, garlic and 1/4 cup reserved vegetable water to th epot and cook, scraping the brown bits from the bottom of the pot, and stirring often until onion is softened. Add tomato paste and cook for one minute. Return beef to pot along with broth, stout, Worcestershire, and thyme. Bring to a low boil, then cover and transfer to oven. Braise for 1 1/2 hours. Remove from oven and stir in the cooled carrots and potatoes. Allow stew to cool uncovered for 1/2 hour before topping with puff pastry (otherwise the pastry will melt). In the meantime, thaw the puff pastry dough and raise oven temperature to 425. When ready to assemble pot pies, cut circles in the dough 1/2-inch wider in diameter than the bowls you plan to use. Fill these individual oven-proof bowls with the stew then top with the pastry dough, pressing dough onto the rim of the bowl to help it adhere. Beat together the egg and tablespoon of water and brush the top of the pastry dough with this egg wash. Place pot pies on a baking sheet and bake until pastry is puffed and golden, about 20 minutes.  


9.20.2011

Book Review: The Cookiepedia

Wouldn't it be wonderful to have all those classic cookie recipes - shortbreads, snickerdoodles, macaroons (and macarons!), and more - in one place? It sure would be, and, now, it is, with Stacy Adimando's new cookbook, The Cookiepedia. With dozens of cookie recipes loaded with helpful tips, this book is a must-have for every cookie lover. We received a review copy of the book from publisher Quirk Books about a month ago, but found ourselves with little time on our hands until last weekend, when, at our five-year-old niece's request, we used the book to make a batch of chocolate chip cookies while Louie the Cat looked on.


First of all, we love the cute cardboard-cut-out look of the cover, and the practical and convenient lie-flat binding. The recipe was straight-forward and easy-to-follow. The cookies had a wonderful molasses flavor that came from adding brown sugar as well as white sugar, and a deep, rich chocolate flavor from using bittersweet chips.


They didn't come out looking like the beautiful picture in the book, that's true. We have baking issues, as you've probably read before. However, they tasted so good that we were inspired to browse the rest of the book.


It is categorized by "type" of cookie (e.g. Chocolaty, Buttery, Fancy, etc.), so you can easily find a recipe to suit your needs, wants, desires and/or cravings. Each and every recipe is accompanied by baking tips, helpful hints, fun anecdotes, cheer-inducing hand-drawn illustrations and even a place for baker's notes. Did we mention the gorgeous photographs that make you want to grab a cookie right from the pages and pour a glass of milk to go along with it?

If you love cookies (and really, who doesn't?), this book full of reinvented-from-the-classics cookie recipes ought to be your next cookbook purchase. We'll be mixing up a batch of the Molasses Spice Cookies this weekend...just in time for fall. Why don't you join us?

The Cookiepedia came out September 6th and can be purchased here, at Amazon.com.

9.19.2011

A Couple in the Kitchen, Being Featured At...

Kent over at Simple Recipes chose our blog to be part of his Featured Foodies list. Check out his fabulous website featuring "Great Recipes. Made Simple." We look forward to a great partnership! Thank you, Kent!

And you can find our recipe for Honey-Soy Chicken with Asian Spices at Baked Chicken Drumstick Recipes.

And, FINALLY, you can now follow us on Facebook!!!

9.16.2011

Kara-Age Chicken with Seared Garlic Green Beans

When we think of Kikkoman, we think of this cartoon, with that uber-catchy song refrain that sticks in our heads for days after we hear it. Show me, show you, Kikkoman! Kikkoman! But now, after receiving a box of Kikkoman Kara-Age Coating Mix through the Foodbuzz Tastemaker Program, we will imagine tasty golden nuggets of chicken fried in a light and tasty coating with hints of soy and ginger as we sing along.


The first things we noticed when we opened one of the two packets included in the box was the wonderful ginger scent and the fine powdery-ness of the coating. The box informs us that Kara-Age is "Japan's popular fried chicken dish" (Show me, show you!) and gives clear and easy instructions that have you eating your Kara-Age in about five minutes. Just cut, toss, shake and fry! While it suggests chicken in the main instructions, it says that it's great for fish as well, and gives a quick recipe for Asian-Style Popcorn Shrimp. An easy dipping sauce, says the box, is Kikkoman (Kikkoman!) Ponzu. We used boneless chicken breasts that we cut into bite-sized pieces, and served our Kara-Age with seared garlic green beans (All right!) for a quick, easy, deliciously savory meal. 

Cut!


Toss and shake!


Fry!


Kikkoman!


Kara-Age Chicken with Seared Garlic Green Beans

Ingredients:
2 tablespoons olive oil
1 pound green beans, trimmed
1 clove garlic, minced
salt and pepper to taste
1 packet Kikkoman Kara-Age Coating Mix
water
1 pound boneless chicken breast, cut into bite-sized pieces
vegetable oil for frying

Heat olive oil in a large skillet over medium heat until very hot but not smoking. Add the green beans and cook for 10-12 minutes, tossing often, until tender and browned in spots. Reduce heat to medium-low and add garlic. Stir for a minute until fragrant. Season with salt and pepper, remove from skillet and set aside on a large serving platter. Meanwhile, pour Kikkoman Kara-Age Coating Mix into a large plastic bag. Moisten chicken pieces with water, allowing excess to drip off. Add chicken pieces to bag and close. Shake well to coat all pieces evenly. Pour vegetable oil into a large heavy skillet, filling it about 1/4-inch high. Heat the oil. Working in batches, fry the chicken in hot oil, turning pieces frequently, until golden brown, about 2 minutes each side. Remove and set on paper towels to absorb excess oil. Place atop green beans to serve.

9.12.2011

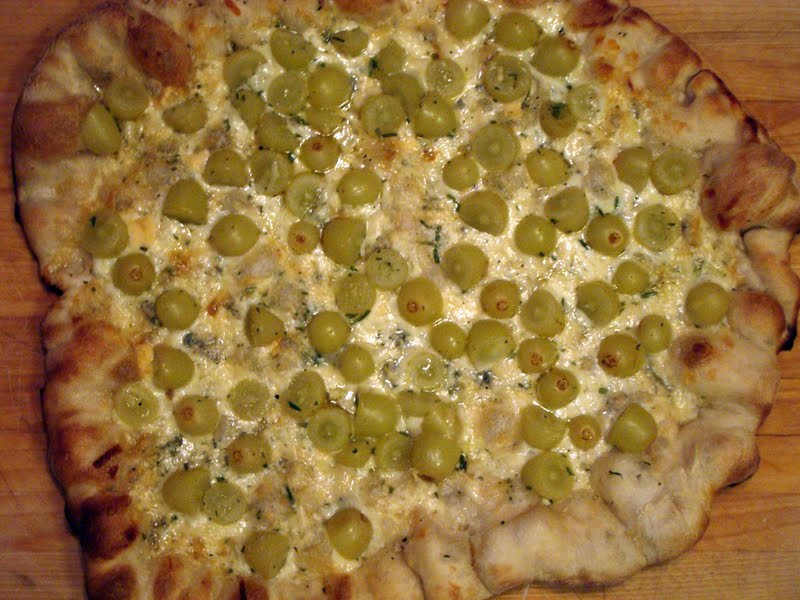
Meatless Monday: Green Grape and Gorgonzola Pizza

Yes, you are reading that correctly. Inspired by one of the pies we saw on Cooking Channel's recent special, "Pizza Outside the Box," we made a Green Grape and Gorgonzola Pizza, a perfect meal for Meatless Monday.

Does it sound strange? Sure. But it's very much like nibbling on a cheese board: three different cheeses, grapes, and bread. A virtual picnic in Paris, no airline ticket needed. We urge you to try it. You won't be disappointed. It's a party on your tastebuds - sweet, salty, crispy, chewy, cheesy, crunchy, tangy, herby and, in a word, fabulous.

Green Grape and Gorgonzola Pizza

Ingredients:
3/4-1 lb. pizza dough
corn meal
olive oil
2 teaspoons kosher salt
1 cup shredded mozzarella cheese
1 cup shredded provolone cheese
1-1 1/2 cups halved grapes
1/3 cup gorgonzola cheese
2 tablespoons chopped rosemary

Place a pizza stone on a rack in the lower third of your oven. Preheat the oven to 450°F for at least 30 minutes. Take the pizza dough and flatten it with your hands on a slightly floured work surface.

Starting at the center and working outwards, use your fingertips to press the dough to 1/2-inch thick. Gently stretch the dough until it reaches the desired diameter - 10 to 12 inches. Use your palm to flatten the edge of the dough where it is thicker. Lightly sprinkle a baking sheet with corn meal and transfer the dough to the baking sheet. Brush the top of the dough with olive oil to prevent it from getting soggy from the toppings. Sprinkle the outer edge of the crust with the kosher salt.


Mix together the mozzarella and provolone cheeses; spread this cheese mixture in a thin layer over the dough. Cover the cheese with the halved grapes. Sprinkle the pizza with the gorgonzola cheese crumbles and chopped rosemary.


Carefully slide the pizza onto the hot pizza stone and bake at 450 for 15-20 minutes, until crust is browned and cheese is melted and golden. Enjoy!


9.11.2011

Labor Day 2011 Rib Smackdown

Two couples, two racks of ribs, one smoker and one gorgeous day off. Sounds like the makings for the Labor Day 2011 Rib Smackdown. Neighbor D offered Chris one rack of ribs and a challenge: season, rub, marinate, do whatever you want to your ribs, but both racks get smoked together, over pecan wood chips, and the wives (us lucky gals!) will judge whose ribs are the tastiest.

While the ribs sat in the smoker all afternoon, we prepared a pitcher of Rummin' Teas and a few side dishes. We started with some chips and salsa. We tossed a bunch of red and yellow potatoes in Crisco's new Pure Olive Oil (a sample of which we received through the Foodbuzz Tastemaker Program) and added  plenty of chopped fresh rosemary, salt and pepper. Then we placed these on the grill in a grilling basket; in 40 minutes, they were perfect - crisp on the outside, soft on the inside.


We steamed a pound of Louisiana Gulf Shrimp in Blue Crab Bay Co. Steaming Spices (a gift from D and J's many travels) to add a little "surf" to our "turf." A few ears of corn roasted on the grill for good measure. And then the ribs were done and it was time to eat. 


Chris had rubbed his rack in a mixture of red sea salt, chipotle pepper and Mexican chocolate, then marinated them in Red Stag Bourbon overnight. These had an intriguing mix of sweet and spicy flavors, from cherry to chocolate to salt to pepper. Very interesting indeed.


D had rubbed his with a little "Butt Rub" and cayenne, then covered them in a paste made from basil, minced garlic and olive oil. They, too, were "finger-licking good" in a more traditional way, and offered themselves over to barbecue sauce a little more easily than the others. Yummy.


Both ribs were tender, falling off the bone and had an sweet smoky flavor from the pecan wood chips. How could we possibly pick one over the other? We had to call in a reinforcement judge - neighbor R who is a long-standing and enthusiastic taste-tester around these parts. He, too, was undecided. Both were just too good. The wives awarded both ribs first place. Let's hear it for the boys and a delicious holiday spent with good friends. It doesn't get much better than this.

9.06.2011

Labor Day Weekend Corn and Black Bean Salsa "Nachos"

The school where Chris teaches has an amazing culinary program. Many of their students graduate to further their education at Johnson and Wales or the Culinary Institute of America, and the lunches he eats on a daily basis compare to some gourmet restaurants we've been to.

That hasn't been the case at Amy's school until recently, with the hiring of "Chef Dave" a couple of years ago, and the new addition of "Chef Debbie," both of whom are turning the school's culinary program upside-down (in a good way!!!). We non-culinary teachers got a taste of things to come Friday afternoon when a school-wide email advertised samples of "Labor Day Weekend Corn and Black Bean Salsa" for immediate noshing along with some conveniently packaged for us take home. Oh happy Friday!!!

Not ones to simply dip a chip, Chris and I took this delicious salsa to a whole other level by making nachos with it, using corn chips (Fritos to be exact) to heighten that delicious summer corn flavor. We laid out some corn chips, topped them with a cup of the salsa and some shredded cheese, and broiled them until the cheese melted. A fabulous snack, indeed! We saved the rest for our Labor Day BBQ with neighbors D and J who loved it as-is.


Laid out on aluminum foil


Topped with shredded cheese


Brown and bubbly nacho deliciousness


Special thanks to the FCS Kitchens at EHS for the samples and for sharing the recipe, (which I have typed verbatim below)!

Labor Day Weekend Corn and Black Bean Salsa

Ingredients:
5 ears corn on the cob, grilled or roasted
1 clove garlic, minced
3 Roma tomatoes, diced 1/2 inch
1 pepper (red, yellow or orange), diced 1/4 - 1/2 inch
1 small red onion, diced
8-10 sprigs cilantro, chopped finely
4 stalks chive, chopped
2 15-ounce cans black beans, drained and rinsed
1 teaspoon white vinegar
1/4 cup freshly squeezed lime juice (the juice of 2-3 limes)

Cook off the corn on the cob; cut kernels off and place in bowl. Drain and rinse black beans and add to corn. Dice to spec the tomatoes, peppers, and red onion and add to bowl. Mince garlic and add to bowl. Remove cilantro leaves from stem. Discard stems. Chop cilantro leaves and place in bowl. Add to bowl the white vinegar and lime juice. Mix all ingredients. Place in presentation bowl and garnish with chopped chives.

9.04.2011

Cocktail Time! The Berry Patch

School may have started, but it's not the end of summer yet! Labor Day weekend is upon us, and fall does not officially start until the autumnal equinox on September 23rd. In the "spirit" of prolonging every teacher's favorite season, we gathered a few tantalizing summertime ingredients to create a cocktail we're calling "The Berry Patch" (special thanks to D and J for taste-testing and tweaking the name). Light, sweet, herby and slightly bubbly, these go down nice and easy!


The Berry Patch
(makes a small pitcher, about six drinks)

Ingredients:
12-14 fresh strawberries, chopped
6-8 leaves fresh basil, torn
1 cup cranberry juice (100% juice, not cranberry cocktail)
1 cup lemonade (we like Newman's Own Lightly-Sweetened)
1 cup vodka
ice
club soda (optional)
extra berries and/or basil leaves for garnish

In a pitcher, muddle the chopped strawberries with the torn basil leaves.

Add the cranberry juice, lemonade and vodka.

Add ice, stir and allow to sit for 15 minutes. Strain into chilled martini glasses. Add a splash of club soda on top if you like it bubbly, and garnish as desired.


Happy Post – FamilyFreshCooking.com

9.01.2011

Sugar and Spice on Pork Belly is Nice

We have been a little bit obsessed by pork belly since we went to a food festival and tasted a teensy-weensy bite of a pork belly dish created by the chefs at Craftsteak. That was almost two years ago, but the memory has stuck with us so much that every time we see pork belly on a menu, we order it, and we watch anything on Food Network or Cooking Channel that even mentions pork belly.

What is pork belly? Pork belly is a boneless cut of fresh pork derived from the belly of a pig. It is a very fatty cut of meat in fact, but when it is cooked correctly, that fat is rendered down and melts into the most delicious thing you've ever tasted. (In our opinion, anyway.)

When we watched that long-ago demonstration by the chefs at Craftsteak, we jotted down notes on what to do. Looking back, they were almost indecipherable, but we decided to go with the flow and attempt our own version of pork belly based on theirs. How bad could it be? It's bacon, for goodness' sake! The most trouble we had was finding the stuff! It was difficult, but finally, we spotted a pound of it at a Portuguese butcher shop in Ludlow, Massachusetts. We (of course) bought it, and our plan was set into motion.


The elusive pork belly

The goal in our minds was to give the pork a sweet and spicy flavor. With that in mind, we rubbed it with a mixture of brown sugar, salt and Chinese five-spice powder. We wrapped it in cheesecloth and enclosed it in a zipper-bag (having squeezed the air out) in the fridge, allowing it to "marinate" in the rub for five days.
Rubbed and ready for wrapping


Into the refrigerator for five days it goes

Afer that, we rinsed and dried it off, then browned it in a frying pan, cured it in a 275-degree oven, allowed it to cool, and browned it once again before serving.


Rinsed and starting to brown


Hot out of the oven

Was it as good as Craftsteak's? Heck, no. But we're teachers, not award-winning celebrity chefs. With that in mind, was it good? Heck, yeah, it was. With flavors of sweet, salty, and spicy on the tongue, and crispy-on-the-outside/melted-on-the-inside pork fat, one or two bites was all you needed, but it left you wanting more. We'll be experimenting with pork belly very soon, well, as soon as we can find some again!

Sugar and Spice Pork Belly

Ingredients:
2/3 cup light brown sugar
1/3 cup kosher salt
1 tablespoon Chinese five-spice powder
1 pound pork belly
oil for frying

In a small bowl, mix together the brown sugar, salt and five-spice. Score the skin of the pork belly, then rub all of the spice mixture over the entire piece of pork belly. Wrap tightly in cheesecloth and seal in an zip-bag, squeezing out as much air as possible. Refrigerate for 3-5 days. Remove pork belly from bag and cheesecloth, rinse off spice mixture., and dry. Heat a tablespoon of oil in a frying pan and brown the pork belly on all sides. Wrap the pork belly in aluminum foil and cure in oven set at 275 degrees for 2 1/2-3 hours. When ready to serve, heat a tablespoon of oil in a frying pan, brown on all sides, and make sure the fat is cooked through. Enjoy in small doses,as a snack or appetizer.